Hi All! I know we are extremely late announcing this winner, apologies for that, but as they say, better late than never!
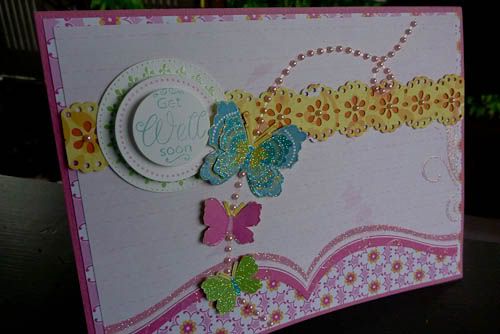
With only one card entry this time picking a winner certainly was easy!! Well done Tereesa, please contact Leisa or Kerri at the shop to organise collection of your lovely Bo-Bunny prize pack.
We will be taking a break from challenges for a little while. As you can all appreciate we are getting to that "time of the year" where all hell breaks loose, well, time gets away with way too many things to do and so little time! We will however try to keep everyone up to date with product in store and any other exciting tid bits as they happen.
Till next time!
Katie
Monday, November 15, 2010
Monday, November 8, 2010
We have heaps of Cricut Cartridges on Special - starting from $49.00!!
Here is a list of available cartridges:-
Disney/Pixar Cars
My World
Hello Kitty Font
Sentimentals
Serenade
Robotz
Superman
Ashlyn's Alphabet
A Child's Year
Stamping
Joys of the Season
Doodlecharms
Winter Woodland
Heritage
Winter Frolic
Simply Sweet
Christmas Cheer
Forever Young
Christmas Village - New!!
Beyond Birthdays
My Community
Stretch Your Imagination
Pagoda
Christmas Cards - New!!
Life's A Beach
From The Kitchen
Going Places
Graphically Speaking
Locker Talk
Paisley
Sweet Heart
Calligraphy
Country Life
Home Decor
Trim the Tree - New!!
Dinosaur Tracks
Paper Doll Dress Ups
Some stock is now available, more stock arriving daily, so we are taking pre-orders now!!
Other cartridges available from $59.00 - please contact us for what is in stock.
Please email us at info@scrapbookcity.com.au, phone us on 07 3378 7257 or fax us on 07 3378 7657. We are currently experiencing technical problems with our internet site, it is currently being worked on at the moment.
Please note - flat rate postage does not apply, we will charge actual postage using Australia Post rates.
Wednesday, October 27, 2010
More Cricut inspiration!
Hi - hope everyone is having a fabulous week!
Now as I promised, here are the photos of some canvases that my sister Leisa and I did for our two nieces for Christmas last year - I have to confess that I was really just the technical advisor on this project as this was Leisa's first time using the Cricut (can you believe it?)!
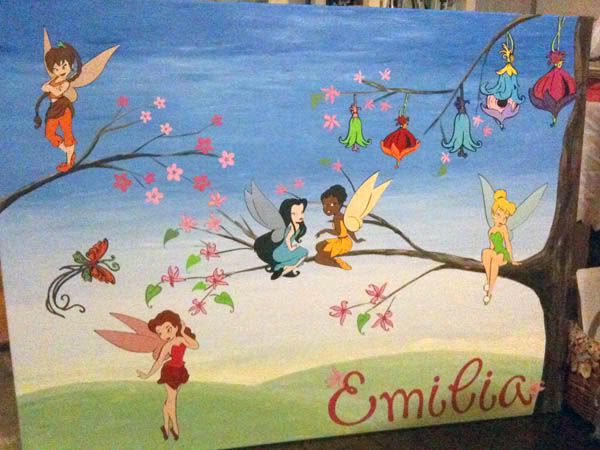
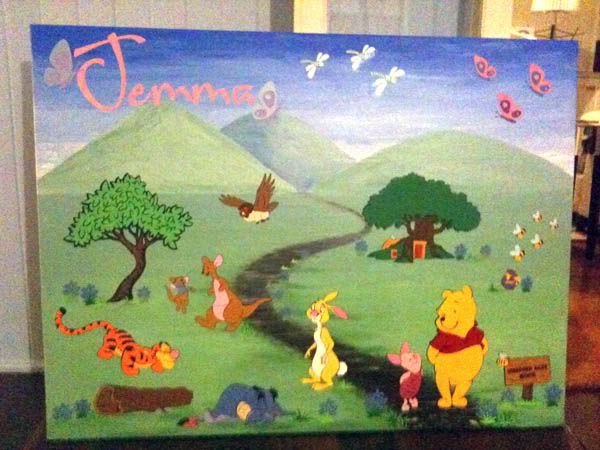
Once again, please excuse my terrible photography - but the only photos that I have were taken with my iphone in very bad lighting.
They were done using the Winnie the Pooh and Tinkerbell and Friends cartridges.
Leisa painted in the background and then cut out all the images with all the layers, stuck them down and varnished over them! I think they were about 1.2 metres in width.
We've done quite a few canvases in a similar way - we've also done one using the Happily Ever After Cartridge - it was of Cinderella dancing with the prince - the little girl that received this one had a Disney Princess themed room and was just thrilled. We've also done a few grown up versions as well - not quite as cute, but definitely as impressive!
I hope this gives you another glimpse as to what you can do with the Cricut and why it is my favourite toy - oops I mean tool!
Have a fantastic week!
LOL and blessings
Christina
Tuesday, October 26, 2010
Winner for Challenge #4
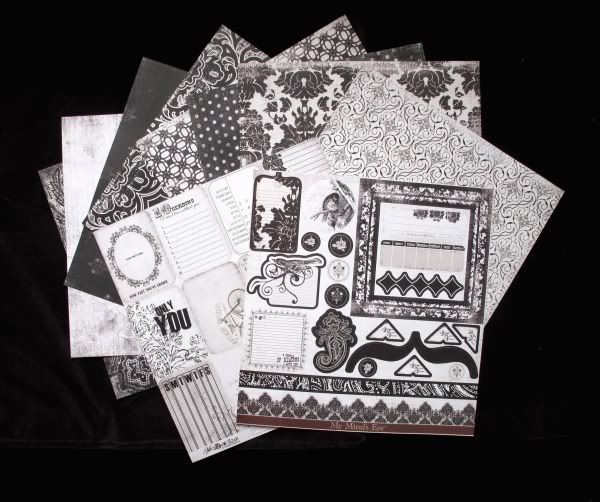
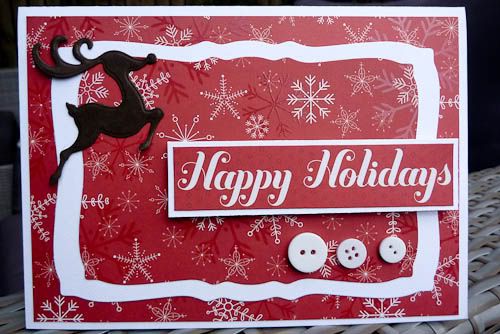
Time to announce the winner for challenge #4 on handmade flowers. We only had one entry for this challenge so lucky Chloe N has won that gorgeous pack of My Minds Eye papers! Contact Leisa or Kerri at the shop Chloe to organise collection.
Challenge #5
Morning all! Time for a new challenge already. My the time is flying by now! Have you got your Christmas cards done yet?? Personally, I won't even think about them until at least the middle of November!
So, given we are all stretched for time at this end of the year we thought an easy challenge was in order (but really, they all have been pretty easy, haven't they??!!). This challenge is a good old sketch challenge. Something we can all have a go at without having to think too long and hard. I like that kind of challenge!
As usual, link your entry with the link button below, you have two weeks, interpret the sketch how you feel (so long as we can see a vague notion of the sketch still remaining it counts!) and keep your fingers crossed that you might win one of the great prizes!
For this challenge we have two brand new releases from Bo Bunny as prizes. Crush and Crazy Love have just been released and they are just beautiful, so to get your hands on a set make sure you enter!
Better give you the sketch I suppose...... So here it is and an example to get you going!

 Card by Nicole
And here is a picture of the fantastic prizes (one for layout and one for card of course!).
 Crazy Love by Bo Bunny
 Crush by Bo Bunny
Till next time!
So, given we are all stretched for time at this end of the year we thought an easy challenge was in order (but really, they all have been pretty easy, haven't they??!!). This challenge is a good old sketch challenge. Something we can all have a go at without having to think too long and hard. I like that kind of challenge!
As usual, link your entry with the link button below, you have two weeks, interpret the sketch how you feel (so long as we can see a vague notion of the sketch still remaining it counts!) and keep your fingers crossed that you might win one of the great prizes!
For this challenge we have two brand new releases from Bo Bunny as prizes. Crush and Crazy Love have just been released and they are just beautiful, so to get your hands on a set make sure you enter!
Better give you the sketch I suppose...... So here it is and an example to get you going!
Card by NicoleAnd here is a picture of the fantastic prizes (one for layout and one for card of course!).
Crazy Love by Bo BunnyCrush by Bo BunnyTill next time!
Monday, October 25, 2010
Hi everyone, my name is Christina and I will be your blog host this week!
I hope you've had a chance to visit the store to view all the fabulous Christmas cards in the Showcase - I know there has been some teasing on the blog - but if not, I would suggest you rush in and see all the great designs!
This was my first year as part of the Showcase and I wanted to do something that showed what you can do with one of my favourite tools - my Cricut!!
Here are two of the cards that I made using the Echo Park Everybody loves Christmas range:
There were two things that I wanted to show with these cards 1. some thinking outside of the box - literally - trying a shape that wasn't a square or rectangle which is so easy with the fabulous range of Christmas cartridges available and 2. how easy layering is with the cricut and my new favourite toys - the cricut design studio and gypsy - resizing of your layers is just so easy and the fact that you can lay out your entire card on one cutting mat - just awesome! You can also overlay everything on the virtual mat to see that all your proportions are about right - such a timesaver - particularly if you are like me and will cut multiple pieces to get just the perfect size.
I am in love with all the new Christmas Cartridges - Christmas Cards, Winter Collection, Winter Woodlands (loving the font!) and my old favourite, Joys of the Season. Check them out in store now so that you have plenty of time to get all those cards made in time for Christmas!
Later in the week, I'm going to upload some photos of some fabulous canvases that we did for my two nieces' bedrooms using the Winnie the Pooh and Tinkerbell cartridges - I think you will be impressed (even if I do say so myself)!
Have a fabulous week!
LOL Christina
Wednesday, October 20, 2010
from one Christmas tree, to . . .
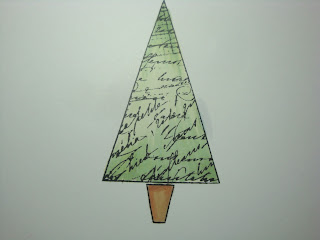
I have always dreamt of experiencing a white Christmas with the snow on the ground and the hills, so I decided to see what I could do with the Hero Arts Christmas Stamps to create a scene.
I started out with stamping the large tree on Copic friendly card with Memento Tuxedo Black ink


I started out with stamping the large tree on Copic friendly card with Memento Tuxedo Black ink

and then did the same with the smaller tree stamp. Then I turned to one of my favourite 'tools' . . . yes my Copics . . . and used a number of the green and earth family sketch markers to colour the trees


I purposely kept the colouring a bit 'rough' because I knew I was going to bling it up with Ranger Star Dust Distress stickles
then I made up a mask and stamped the trees on more copic friendly card before colouring as above

next I cut out another mask so I could ink the background. To do this, I made up some cloud and ground masks from scrap Bazzill Cardstock (you can also do this with post-it notes and plain paper, but I have the found the bazzill a bit stronger when using the Inkessentials Blending tool to blend the inks)

as you can see I tried out a couple of different 'blues' on a scrap piece of paper first. I used Tim Holtz Distress Inks Broken China, Bundled Sage and Antique Linen for the sky and the ground

To finish the card, I used some of my favourite designer paper at the moment - My Minds Eye Lost and found as well as the Best Creations Bling card (I embossed this strip with Cuttlebug dots)
Next, I roughed up the edges of the card used to stamp the background and stamped the Merry Christmas sentiment (from the same Hero Arts Christmas stamp pack as that for the trees). Next came dimensional dots on the front tree and then the same for the main tree image. Finally I used a white gel pen for the stars in the sky
Overall I was happy with the outcome but am already thinking about some minor things I would change next time.
Here is the finished product (with a close up as well)


Have some fun with stamps and masks and see what you come up with
till next time . . .

Craft & Quilt Fair
Have you visited the Craft and Quilt Fair at the Convention Centre yet? It runs until Sunday, so still time.
Some of the quilting ideas could easily be translated into cards and layouts.
Visit Scrapbook City in aisle H for some amazing specials on Spellbinders and Tim Holtz dies, Martha Stewart and EK success punches, Cuttlebug embossing folders to mention just a few. Oh . . . and some absolutely beautiful papers. Check out the flocked, embossed and bling 12x12 paper pads (double sided).
PS: I got my stash yesterday :)
Monday, October 18, 2010
Best Creations Bling Cardstock
Hi, it is Rita here and I will be your Blog Host for this week.
Have you seen the Best Creations ‘bling’ cardstock? It is soooo shiny and yet the ‘shine’doesn’t come off when you touch it. The cardstock is strong and easy to manipulate. Spellbinder and Heartfelt Creation dies cut it like a dream. It embosses really beautifully as well. You can use for embellishments or as a background for a card.
The cardstock is available in a number of colours – check it out at the shop!


Wednesday, October 13, 2010
Winner for Challenge #3
Happy Thursday everyone! And hasn't it been nice to see the sun today! So, are you hanging on the edge of your seat to find out the winner for the colour combo challenge??!! Well I thought I had better put you out of your misery...
So without further ado... the winner is entry number 4, which is Cecelia B! Congratulations and make sure to contact Kerri or Leisa at the shop to collect your prize.
Don't forget to get those entries in for the handmade flower challenge!
So without further ado... the winner is entry number 4, which is Cecelia B! Congratulations and make sure to contact Kerri or Leisa at the shop to collect your prize.
Don't forget to get those entries in for the handmade flower challenge!
Monday, October 11, 2010
Challenge #4
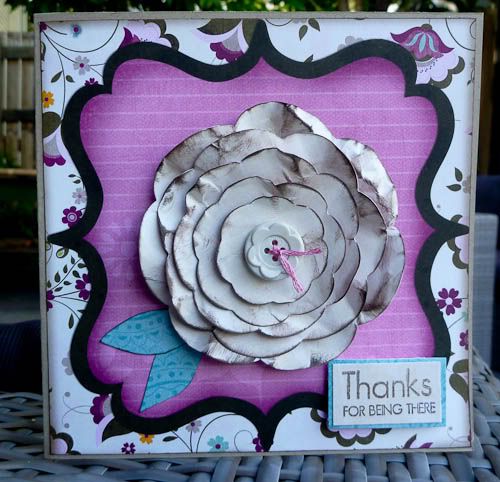
Happy Tuesday to everyone! I hope you are all ready for the next challenge! This week we thought we would focus on flowers. Flowers are everywhere in the scrapbook and card market place, but what has been even more popular is creating your own flowers. So the challenge is to create a card and add some of your very own handmade flowers!
There are plenty of ways you can make your own flowers, think layered die cut or punched flowers, rolled flowers, crocheted flowers or even hand cut flowers. Plenty of ideas! And of course we have some samples for you to get you started.
 Card by Sandra
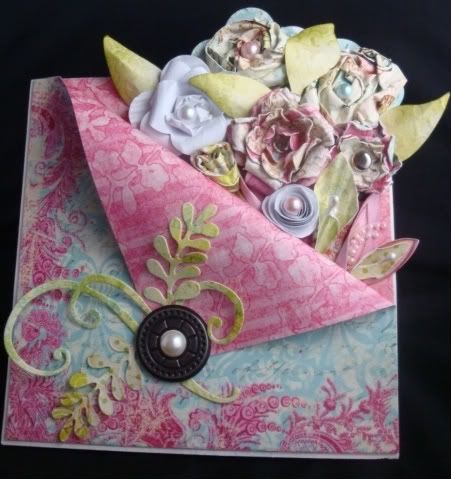
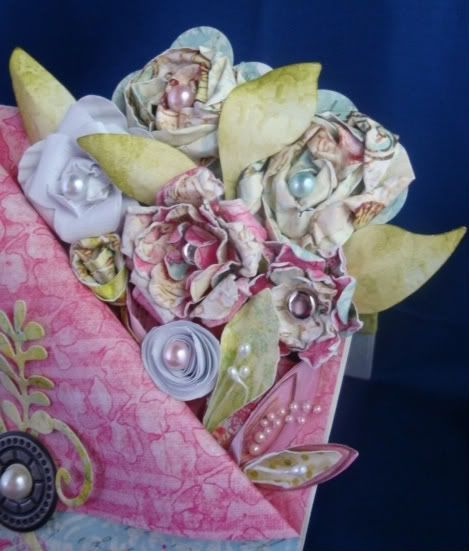 Card by Rita
Some gorgeous examples of handmade flowers there! And for one lucky winner there is this great pack of My Minds Eye Meadow Lark paper. As usual you have two weeks to uplaod your card. And I have found out that you don't need to have a blog to link! You can paste a link from an on-line album like Photobucket or Flickr!
So get creating and I can't wait to see what you come up with. Challenge #3 finishes tomorrow so you still have almost a day to get something in! I will be back on Thursday to announce a winner.
PS - I will be back to show you more detail of Rita's intricate card. There is some surprising detail to this card, so make sure you pop back and see just how this works!
There are plenty of ways you can make your own flowers, think layered die cut or punched flowers, rolled flowers, crocheted flowers or even hand cut flowers. Plenty of ideas! And of course we have some samples for you to get you started.
Card by SandraCard by RitaSome gorgeous examples of handmade flowers there! And for one lucky winner there is this great pack of My Minds Eye Meadow Lark paper. As usual you have two weeks to uplaod your card. And I have found out that you don't need to have a blog to link! You can paste a link from an on-line album like Photobucket or Flickr!
So get creating and I can't wait to see what you come up with. Challenge #3 finishes tomorrow so you still have almost a day to get something in! I will be back on Thursday to announce a winner.
PS - I will be back to show you more detail of Rita's intricate card. There is some surprising detail to this card, so make sure you pop back and see just how this works!
Felt Flowers with Spellbinders.
Hi, Nic here. I'm your hostess on the Card City Blog this week. Since the new challenge to be launched tomorrow is handmade flowers, I thought I would concentrate on tips and techniques for handmade flowers! Inspirational huh!
As I am also a bit of a tool freak, today's post is about cutting felt, specifically flowers, with spellbinders dies. Spellbinders dies cut felt easily which means you can have cute little handmade felt flowers in just minutes.
I cut these white felt flowers on this card using Spellbinders "Dahlia" Nestability dies in my wizard machine. Then I layered all the pieces to create one flower.

The cutting sandwiches (from bottom up) are:
Wizard: White master mat, tan embossing mat, die (cutting side up), felt, charm embossing mat. NOTE: This is different to the sandwich recommended by Spellbinders, this is what I have found works for my machine.
Cuttlebug: A Plate, B Plate, die (cutting side up), felt, B plate. NOTE: Depending on the age of your plates, you may also need a shim between the A & B plates.
The best thing is, a piece of felt is only 40cents at Scrapbook City, and you can make about 3-4 flowers just like this one from one piece. Very thrifty!
Oh and whilst you are at Scrapbook City being thrifty with felt, ask Leisa or Kerri to show you the new Martha Stewart around the page border and corner punches - they have just arrived and are hot, hot, hot! Gotta love a good tool!
Come back soon and I will have more for you on handmade flowers!
Nic
As I am also a bit of a tool freak, today's post is about cutting felt, specifically flowers, with spellbinders dies. Spellbinders dies cut felt easily which means you can have cute little handmade felt flowers in just minutes.
I cut these white felt flowers on this card using Spellbinders "Dahlia" Nestability dies in my wizard machine. Then I layered all the pieces to create one flower.
Here's a close up of the flower:
The cutting sandwiches (from bottom up) are:
Wizard: White master mat, tan embossing mat, die (cutting side up), felt, charm embossing mat. NOTE: This is different to the sandwich recommended by Spellbinders, this is what I have found works for my machine.
Cuttlebug: A Plate, B Plate, die (cutting side up), felt, B plate. NOTE: Depending on the age of your plates, you may also need a shim between the A & B plates.
The best thing is, a piece of felt is only 40cents at Scrapbook City, and you can make about 3-4 flowers just like this one from one piece. Very thrifty!
Oh and whilst you are at Scrapbook City being thrifty with felt, ask Leisa or Kerri to show you the new Martha Stewart around the page border and corner punches - they have just arrived and are hot, hot, hot! Gotta love a good tool!
Come back soon and I will have more for you on handmade flowers!
Nic
Saturday, October 9, 2010
Heart Felt Creations
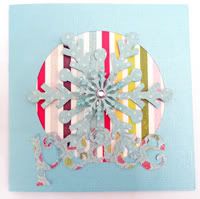
Have you seen the great new stamps with matching dies from Heart Felt Creations yet? Well if you haven't, you need to check them out! Here are a couple of cards made using a snowflake stamp set and matching ornament die. Each arm of the snowflakes are separate, so hiding under the centre piece is where they all join!
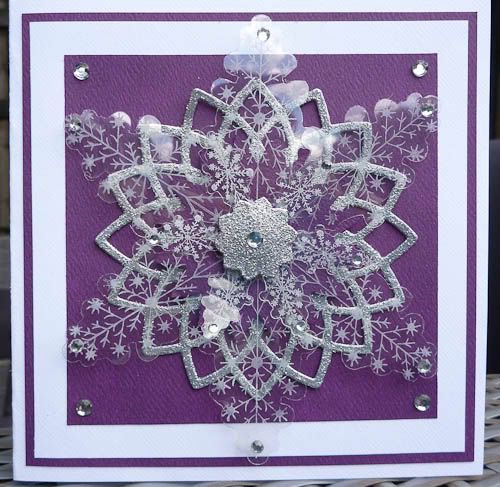
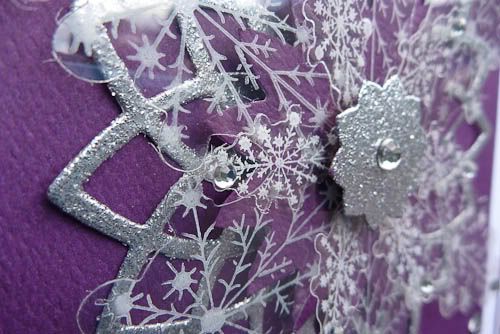
This next card uses the same ornament die set. This time I have created my own background with stamping and embossing effects. Which goes to show, if you can't find the patterned paper that is exactly what you want you can always create your own!
Sandra
This next card uses the same ornament die set. This time I have created my own background with stamping and embossing effects. Which goes to show, if you can't find the patterned paper that is exactly what you want you can always create your own!
Sandra
Thursday, October 7, 2010
Christmas ranges are in-store now
Yes, I know Christmas comes a little early for some (me included!!) ... but I was lucky enough to be able to make some Christmas Cards from the Imaginisce Papers. I loved them all. Here are a couple of my cards.

I've loved using lots of different combinations of Spellbinders dies with these to create so many different looks. Scrap Book City are holding Christmas Extravaganza Showcases over the coming weeks, so be sure to give them a call to find out when you can go along to a session and see what all the DT girls have been up to.
Sandra
Wednesday, September 29, 2010
Winner and Prize
Well, have made it to the shop to photograph the prize for the new challenge! And I am here to announce the winner for the Bling challenge!
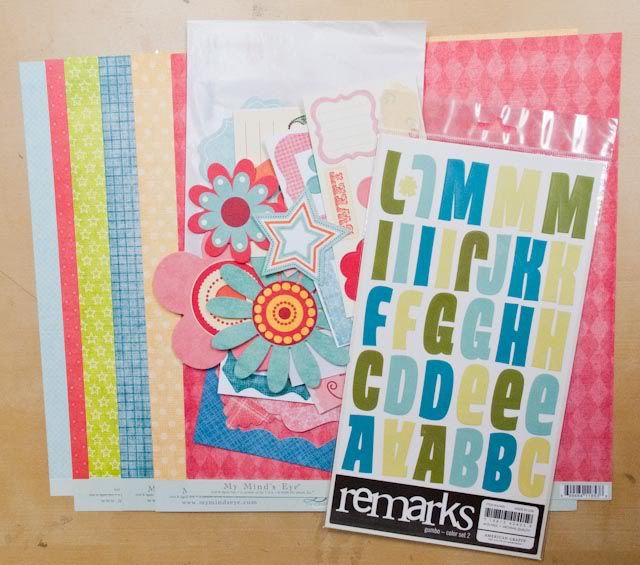
First thing, the prize for the Colour Challenge is a great pack of goodies from My Minds Eye and American Crafts. There is a selection of double sided papers, a goody bag filled with assorted die-cuts, frames and transparencies and a pack of Remarks letter stickers! Very cool! So there is a prize pack like this for each of the winners from the layout blog and card blog.
 Note: contents may vary from picture displayed, but will be of an equivalent value
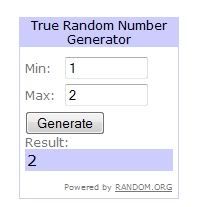
And now for the random winner:
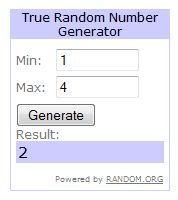
Number 2 on the card blog is...... Anne Patterson! Congratulations Anne , contact Leisa or Kerri at the shop to collect your prize!
PS Anne, I think you need to hide from Cynthia for a while, or perhaps share your booty with her!!
First thing, the prize for the Colour Challenge is a great pack of goodies from My Minds Eye and American Crafts. There is a selection of double sided papers, a goody bag filled with assorted die-cuts, frames and transparencies and a pack of Remarks letter stickers! Very cool! So there is a prize pack like this for each of the winners from the layout blog and card blog.
Note: contents may vary from picture displayed, but will be of an equivalent value And now for the random winner:
Number 2 on the card blog is...... Anne Patterson! Congratulations Anne , contact Leisa or Kerri at the shop to collect your prize!
PS Anne, I think you need to hide from Cynthia for a while, or perhaps share your booty with her!!
Monday, September 27, 2010
Challenge #3
Here we are another fortnight gone already. They really are rolling around pretty fast aren't they??!! So are we all "blinged" out and ready for another challenge then?? This is going to be an easy one too. We like easy here at Scrapbook City, we don't want to have to think too long and hard about things!
This challenge is a colour combo challenge! Spring is in the air so we selected a nice bright "Springy" kind of palette. All you need to do is use this colour palette as the basis for your card. These are the only colours besides white and black that you can use, but you can vary the shade (darkness) or tint (lightness) of them a little if you need to! And for some "colour theory" ideas to help get you started think about the 60 30 10 rule for combining colours. 60% use of your main colour, 30% of your second colour and 10% splash of your highlight colour! You have five colours to choose from so that should be easy!

Here is some inspiration for you from our wonderful card makers.
 Card by Nicole
 Card by Sandra
Once again you have two weeks to link your creation to our gallery, and once again we have an awesome prize up for grabs! Prize details to come later today (I have to get me to the shop to take a photo!!!). And because we have put this challenge up a day later than usual you will get an extra bit of time to get your entries in! It is only fair after all!!
This challenge is a colour combo challenge! Spring is in the air so we selected a nice bright "Springy" kind of palette. All you need to do is use this colour palette as the basis for your card. These are the only colours besides white and black that you can use, but you can vary the shade (darkness) or tint (lightness) of them a little if you need to! And for some "colour theory" ideas to help get you started think about the 60 30 10 rule for combining colours. 60% use of your main colour, 30% of your second colour and 10% splash of your highlight colour! You have five colours to choose from so that should be easy!
Here is some inspiration for you from our wonderful card makers.
Card by NicoleCard by SandraOnce again you have two weeks to link your creation to our gallery, and once again we have an awesome prize up for grabs! Prize details to come later today (I have to get me to the shop to take a photo!!!). And because we have put this challenge up a day later than usual you will get an extra bit of time to get your entries in! It is only fair after all!!
Sunday, September 26, 2010
Hello!
Hello, and happy Monday to you all! Just a quick reminder that you have a little under two days to do your Bling challenge and get it linked. So far there is only one entry, so get an entry in and give Cynthia some competition! The prize is the great i-Rock tool with some accessories from Imaginisce.
Also, Scrapbook City had their retreat over the weekend and there are now some photos up on the retreat blog. If you weren't able to attend check them out for a bit of a giggle, and if you were, go and check them out to remind yourselves of the hysterics from Friday night!
Catch you soon!
Also, Scrapbook City had their retreat over the weekend and there are now some photos up on the retreat blog. If you weren't able to attend check them out for a bit of a giggle, and if you were, go and check them out to remind yourselves of the hysterics from Friday night!
Catch you soon!
Tuesday, September 21, 2010
A couple of Copic marker tips
In my previous post I mentioned the Colorless Blender No 0. The two main reasons I use this marker are: removing mistakes and removing colour, for example:
 going outside the line on the face of the stamped (with Memento Tuxedo Black ink) image
 Use the non brush end of the blender pen to push the colour up to the line - dont go over the line. If a darker colour, you may need to let the first coat dry and then repeat the procedure
 I could have worked on this a little more, but just wanted to show you the basic steps.
 In this image, I lay down the basic colours for the apron, and then wanted to give the fabric a 'lighter' look - make it look more flowy (if that's a word). I used the blender pen, let it dry and then checked and added more to try and obtain effect I was looking for

. . . and with some of the colour removed

This is the finished look I was trying to achieve
Tips on air brushing soon.
 happy crafting!


. . . and with some of the colour removed
This is the finished look I was trying to achieve
Tips on air brushing soon.

Sunday, September 19, 2010
My Copic Marker journey . . . so far
Hello everyone, my name is Rita and I am your card blog host for this week.
Welcome to my COPIC JOURNEY . . . so far
Welcome to my COPIC JOURNEY . . . so far
Who would have thought! I have been an avid scrapper of mainly layouts and beyond the page items for many years, followed by making cards to give to family and friends. I like to use my Spellbinder, Cuttlebug and Cricut machines, but have now discovered stamps, and what is more – stamps coloured with Copics. I now have a magic tool to enhance some of my projects and look at colours and designs in a different way. The markers work so well with all projects requiring some extra colour or a little bit of oomph!
How did I start? - I arrived at Scrapbook City one day and was greeted by Leisa with ‘guess what we have in stock now?’ and that was the beginning of my journey (thanks Leis!) . . . what a new world! I prefer the Sketch Markers carried by the Store because:
· They are easy to find (with the number on the lid), and store

· In my opinion, a beginners guide of colours would be to have at least two Copic colours from each colour family ( illustrated below) for blending and highlighting your project (however, it is hard to stop at 2!)
· The Sketch markers are Airbrush compatible (more of that later in the week)
· Unique shape - they dont’ roll away from you when you put them down on the table
To get started colouring with Copics, my basic necessities are:
· Blending paper
· Colourless Blender pen/ink (refillable) – this pen is used for making colours lighter and for fixing
mistakes (more later)
mistakes (more later)
· Ink your favourite stamp with Memento Tuxedo Black Ink (fade-resistant dye ink)
· Copic Sketch Markers of your choice (also refillable)
There are lots of on-line tutorials and I have a couple of favourites – it is a matter of personal preference I think. When I first started colouring with Copics, I realised very quickly not to get too disappointed if things don’t work out immediately – it is a matter of practice and personal preference to gain the end result.
Here is a very quick idea for using Copics . . . For this image, I have purposely used the feathered look to highlight the shading of the two colours (from each family) used. For me, this image lends itself to this type of colouring as well – a bit quirky. That’s what I love about Copics – you can add as little or as much as you like to achieve the effect you are most happy with. |  Choosing and experimenting with colour combinations on blending card |  Step 1 – Laying down base with E000 |
 Step 2 – adding highlights with E00 and R20 for cheeks |  Step 3 - V15, V12 and a touch of V000 for Dress and shoes |  Step 4 – same colour combination for flower, but added Y35 & Y38 for middle of flower |
 Step 5 – RV 11 & RV14 for handbag and necklace |  Step 6 – E51 & E53 for hat and BG000 for mirror reflection |  Step 7 – C1 & C3 for ground and Ranger Star Dust stickles on purse, flower & necklace (a girl has to have some bling J) |
And the finished card . . . . using Spellbinders Classic Ovals large, edged oval shape with Spun Sugar Distress Ink, mounted on to embossed Bazzill cardstock (using Cuttlebug), layered onto purple Bazzill cardstock. Added a little Copic pen to the embossing with a touch more of the Ranger Star Dust stickles.

I have come a long way on my short journey so far, and look forward to learning something new all the time. I would love to hear about your Copic experiences too!
It would be great to catch up with other Copic enthusiasts at the upcoming Scrapbook City Retreat next weekend! (perhaps you could share your photography skills with me too J )

Subscribe to:
Posts (Atom)